1.
트레이딩서버를 위한 OS로 주로 사용하는 것은 Centos, Rockylinux입니다. RHES도 있지만 유료(Subscription)이기 때문에 부담이 됩니다. 오버클락서버에 OS를 설치할 때 거의 문제가 발생하지 않습니다. Ubuntu도 마찬가지입니다.
그런데 아주 드믄 경우가 있습니다.
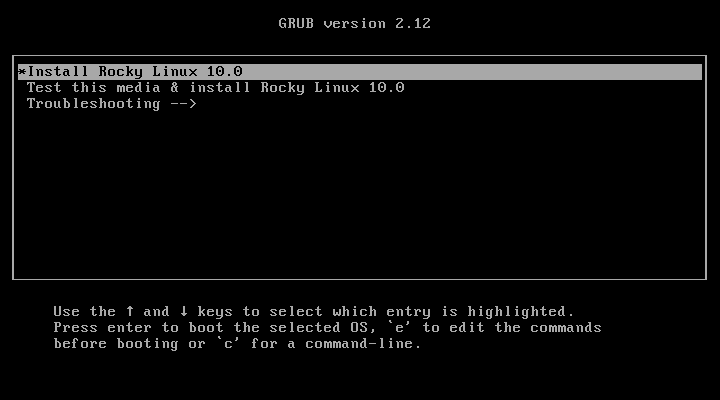
위 메뉴에서 어떤 메뉴를 선택하더라도 아래와 같은 오류가 발생합니다. Asus 마더보드중 일부의 경우 오류가 발생합니다.
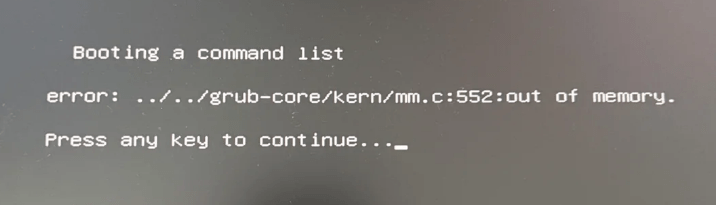
아니면 “can’t allocate kerne” 라는 메시지가 보이면서 멈춥니다. 검색을 해보면 boot menu에서 편집 모두로 들어가서 ‘intel_iommu=off” 혹은 “nomodeset”를 추가해서 해보라고 합니다. 해보면 결과가 역시나 예상 그대로입니다. 증상이 같습니다.
자주 보이는 답변중 ventoy를 이용해 보지만 같은 증상입니다. Raw Image(DD mode)로 USB를 만들어서 해보라고 합니다. 예를 들면 아래와 같은 명령어로 USB를 만든다음에 설치해보라고 합니다. 결과는 달라지지 않습니다.
sudo dd if=rocky-9.9-dvdO.iso of=/dev/sdc bs=4M status=progress oflag=direct && sync
이 정도 해보면 혹 다른 OS는 어떨까 하는 궁금증이 생깁니다. 가장 최신의 우분투인 22.04를 설치해보았습니다. 아무런 문제없이 완벽히 설치하였습니다. 왜 다른 결과가 나올까요? Grub 버전이 문제라는 이야기가 있습니다.
On hardware that enforces strict memory protection attributes (PcdDxeNxMemoryProtectionPolicy=0x7FD5), we observed:
grub 2.12 boots successfully under the strict memory protection attributes.
grub 2.06 fails to boot (page fault) under the same firmware configuration.
Rocky Linux 9 currently ships grub 2.06.
grub 2.06 (Rocky 9) fails to boot under strict memory protection attributes (PcdDxeNxMemoryProtectionPolicy=0x7FD5)중에서
이를 정리하면 아래와 같습니다.
The reason Ubuntu succeeds while Rocky Linux 8 or 9 fails with an “out of memory” error comes down to how their respective installer files are packed, alongside differences in the GRUB bootloader versions they use:
Massive Initramfs Size: Rocky Linux (RHEL-based) bundles a massive variety of enterprise drivers into its installer ramdisk (initramfs). This file is significantly larger than Ubuntu’s.
Old GRUB Memory Maps in Rocky: Rocky Linux 8 and 9 ship with GRUB 2.06, which contains a known limitation allocating high-memory regions on newer system firmwares. Ubuntu ships with a newer or heavily patched GRUB version that dynamically maps memory safely.
결국 메모리 용량은 부족하지 않은데 메모리가 부족하다고 설치를 멈춥니다. 구체적으로 설명한 IBM 자료입니다. RHES와 RHES에 기반을 둔 배포판 모두에 해당하는 사항입니다.
Real mode area (RMA) is a part of RAM which is used by GRUB2 for its operations and to load all the required boot components (Mods, drivers, initrd etc) for successful booting. The size of the RMA is negotiated from GRUB2 as well as from Linux kernel. The current size of the RMA is 512 MB. In most scenarios, the current RMA size is large enough to hold the Linux kernel, initramfs, Partition Firmware (PFW), GRUB2, and working memory for early Linux boot. However, there are some scenarios where GRUB2 memory usage might over run the 512 MB limit, and the logical partition might fail to boot while throwing an out of memory error.
If either the kernel image or the initramfs requires more than 95 MB, then GRUB2 might fail with an out of memory error when it attempts to load them. Generally, the default installed initramfs and vmlinux are well within the limits, but if Firmware Assisted Dump (FADump) is enabled in the system, the default initramfs size might increase and go beyond 95 MB and machine boot might end up in a GRUB memory issue.
A similar out of memory issue in GRUB2 might occur while doing an OS installation via DVD or vDVD. The OS installation via DVD or vDVD require more memory in RMA due to a larger initramfs size. This requirement of more memory in RMA leads to the out of memory issue. In addition, vTPM and Secure Boot when enabled also use memory in the RMA region, which results in higher memory usage in the RMA and in some scenarios, can lead to out of memory in GRUB2.
System boot ends in Grub Out of Memory (OOM)중에서
2.
우회로를 생각해보았습니다. 상상가능한 방법입니다.
Ubuntu를 설치한 후 Rockylinux로 전환하는 방법이 있을까?
Centos8 혹 Rockylinux 8과 같은 옛날 버전을 설치한 후 업그레이드를 하는 방법은 있을까?
우선 후자는 너무 절차가 복잡합니다. 꼬일 가능성이 너무 높고 시간도 오랩니다. 그래서 첫번째 방법을 고민했습니다. 구글이 참신한 방법을 제안합니다.
SSD-Direct Bypass라고 명명했지만 널리 사용하는 명칭은 아닙니다. 단순히 설명하면 Ubuntu의 부팅로더를 이용하여 Anaconda Installer를 실행하는 것입니다.
이를 위해 준비할 사항입니다. 부팅 USB가 아닙니다.
ISO파일을 그대로 복사한 USB
위를 준비한 상태에서 우분투를 시작합니다. 터미널을 열어서 아래와 같은 명령어를 실행합니다. USB와 ISO파일을 각각 Mount합니다.
sudo mkdir -p /mnt/usb /mnt/iso
sudo mount /dev/sdb1 /mnt/usb
sudo mount -o loop /mnt/usb/Rocky-9.8-x86_64-dvd.iso /mnt/iso
이후 아래와 같이 부팅에 필요한 파일을 복사합니다. PXE용 파일입니다.네트워크를 통해 OS를 설치하거나 부팅하는 PXE(Preboot Execution Environment) 환경의 핵심 파일들입니다. 왜 pxeboot를 이용할까요? 최소한의 메모리를 사용하기 위함입니다.
pxeboot/vmlinuz 의 역할: “리눅스 커널 (Kernel)”
역할: 리눅스 운영체제의 **심장(핵심 실행 파일)**입니다. 컴퓨터의 CPU, 메모리, 저장 장치 등 하드웨어를 직접 제어하는 실체
특징: 네트워크 전송 속도를 높이기 위해 컴파일된 커널 소스를 압축해 놓은 상태입니다. (이름 뒤의 z가 압축(vmlinux + zip)을 의미
PXE 과정에서의 동작: PXE 부팅 시 네트워크(TFTP 서버)를 통해 가장 먼저 클라이언트 PC의 메모리로 다운로드되어 압축이 풀리며 실행pxeboot/initrd.img 의 역할: “초기 임시 램디스크 (Initial RAM Disk)”
역할: 커널(vmlinuz)이 실제 하드디스크나 네트워크에 있는 진짜 OS 파일 시스템에 접근할 수 있도록, 최소한의 드라이버와 도구를 모아놓은 임시 미니 OS 이미지
특징: 리눅스 커널은 메모리에 로드된 직후에는 네트워크 카드 드라이버나 복잡한 디스크 드라이버를 가지고 있지 않습니다. 따라서 initrd.img가 램(RAM) 위에 가상 디스크를 임시로 만들고 그 안에 필요한 드라이버들을 제공
PXE 과정에서의 동작: 이 이미지 덕분에 PC는 네트워크 드라이버를 로드하고, 인스턴스(Anaconda 등)를 실행하여 원격 서버에서 본격적인 설치 파일들을 받아올 수 있게 됩니다
sudo cp /mnt/iso/images/pxeboot/vmlinuz /boot/vmlinuz-rockydvd
sudo cp /mnt/iso/images/pxeboot/initrd.img /boot/initrd-rockydvd.img
sudo umount /mnt/iso
sudo umount /mnt/usb
이제 복사한 파일을 이용하여 부팅할 수 있도록 환경을 만듭니다. 이제 Rockylinux 설치를 위한 부팅메뉴를 수동으로 추가합니다. 수정할 파일입니다.
/etc/grub.d/40_custom
그리고 아래와 같은 식의 설정을 추가합니다.
|
1 2 3 4 5 6 7 8 9 10 11 12 13 14 15 16 17 18 19 20 |
#!/bin/sh exec tail -n +3 $0 # This file provides an easy way to add custom menu entries. Simply type the # menu entries you want to add after this comment. Be careful not to change # the 'exec tail' line above. if [ -f ${config_directory}/custom.cfg ]; then source ${config_directory}/custom.cfg elif [ -z "${config_directory}" -a -f $prefix/custom.cfg ]; then source $prefix/custom.cfg fi menuentry "Install Rocky Linux 9.8 DVD (Offline USB Bypass)" { insmod part_gpt insmod ext2 insmod exfat set root='hd1,gpt2' linux /boot/vmlinuz-rockydvd inst.stage2=hd:LABEL=rocky:/Rocky-9.8-x86_64-dvd.iso quiet initrd /boot/initrd-rockydvd.img } |
root=’hd1,gpt2′
부팅 파일(vmlinuz, initrd)이 들어있는 대상 파티션을 GRUB의 기본 디렉터리(Root)로 지정
위에서 hd1: 시스템의 두 번째 하드디스크(또는 부팅용으로 꽂은 USB 메모리)를 뜻하고 gpt2는 디스크의 두 번째 GPT 파티션을 의미합니다.
linux /boot/vmlinuz-rockydvd inst.stage2=hd:LABEL=rocky:/Rocky-9.8-x86_64-dvd.iso quiet
앞에서 복사한 루트 파티션의 /boot/vmlinuz-rockydvd 경로에 있는 리눅스 커널을 로드하면서 추가 옵션을 전달합니다.
이제 가장 중요한 부분입니다.
inst.stage2=hd:LABEL=rocky:/Rocky-9.8-x86_64-dvd.iso
inst.stage2 옵션은 Red Hat 계열(Rocky Linux, RHEL, Fedora 등)의 OS 설치 프로그램인 Anaconda가 설치에 필요한 핵심 그래픽 UI 및 패키지 이미지(Stage 2)를 어디서 읽어와야 하는지 지정하는 핵심 부팅 매개변수(Parameter)라고 합니다.위 패러미터에 대한 설명입니다.
hd: 하드디스크나 USB 같은 물리적인 저장 장치
LABEL=rocky 디스크 파티션 이름(볼륨 라벨)이 rocky인 장치를 확인
:/Rocky-9.8…iso 해당 장치의 루트(/) 디렉터리에 있는 Rocky Linux ISO 파일 내부에서 Stage 2 이미지를 직접 추출
이상의 작업을 한 후 수정사항을 grub에 반영합니다.
sudo update-grub
OS를 설치하여야 합니다. 그것도 특정한 OS를 설치하여야 합니다 그런데 이상하게 자꾸 오류가 발생합니다. 그럴 때 한번 고민해볼 우회로입니다. 저는 성공했습니다.
